

The first step for creating a personalized fertilization plan for your crop on the i-Plant Nutrition software is by inserting soil test’s results. Soil tests are the best way to get to know the soils’ needs and capacity, however, before a lab run analysis on nutrients available in the soil, a sample must be collected from the field in which the crop will be sowed and if that is not done correctly, it will interfere with the rest of the process.
If you would like to know what to consider when withdrawing soil samples for your field, this article is a must-read!
 DIVIDING THE LAND INTO SIMILAR PARTS
To start with it is important to select the land that will be planted and divide it into zones. The total
heterogeneous area should be divided into homogeneous glebes delimited and sized according to some aspects
of greater relevance since it is understood that normally the areas are not 100% alike.
DIVIDING THE LAND INTO SIMILAR PARTS
To start with it is important to select the land that will be planted and divide it into zones. The total
heterogeneous area should be divided into homogeneous glebes delimited and sized according to some aspects
of greater relevance since it is understood that normally the areas are not 100% alike.
These zones should be similar in terms of soil characteristics (sandy or clay texture), ground relief (hill, flat or lowered) vegetation and previous use (pasture, forest, etc.). For each similar part (zone), a soil analysis should be made.
For perennial crops, the age and variety of plants should also be considered. Areas with the same crop, but with very different yields, should be sampled separately.
 WHEN TO COLLECT THE SAMPLES?
The analysis will present different results according to the time of year they were sampled. Thus, it is not
indicated to collect in surplus periods or water stress, due to the difficulty of sampling in very dry or
water-saturated soils. Extremely wet soils are difficult to collect and mix into samples; therefore, it is
best to wait for soil drainage before sampling.
WHEN TO COLLECT THE SAMPLES?
The analysis will present different results according to the time of year they were sampled. Thus, it is not
indicated to collect in surplus periods or water stress, due to the difficulty of sampling in very dry or
water-saturated soils. Extremely wet soils are difficult to collect and mix into samples; therefore, it is
best to wait for soil drainage before sampling.
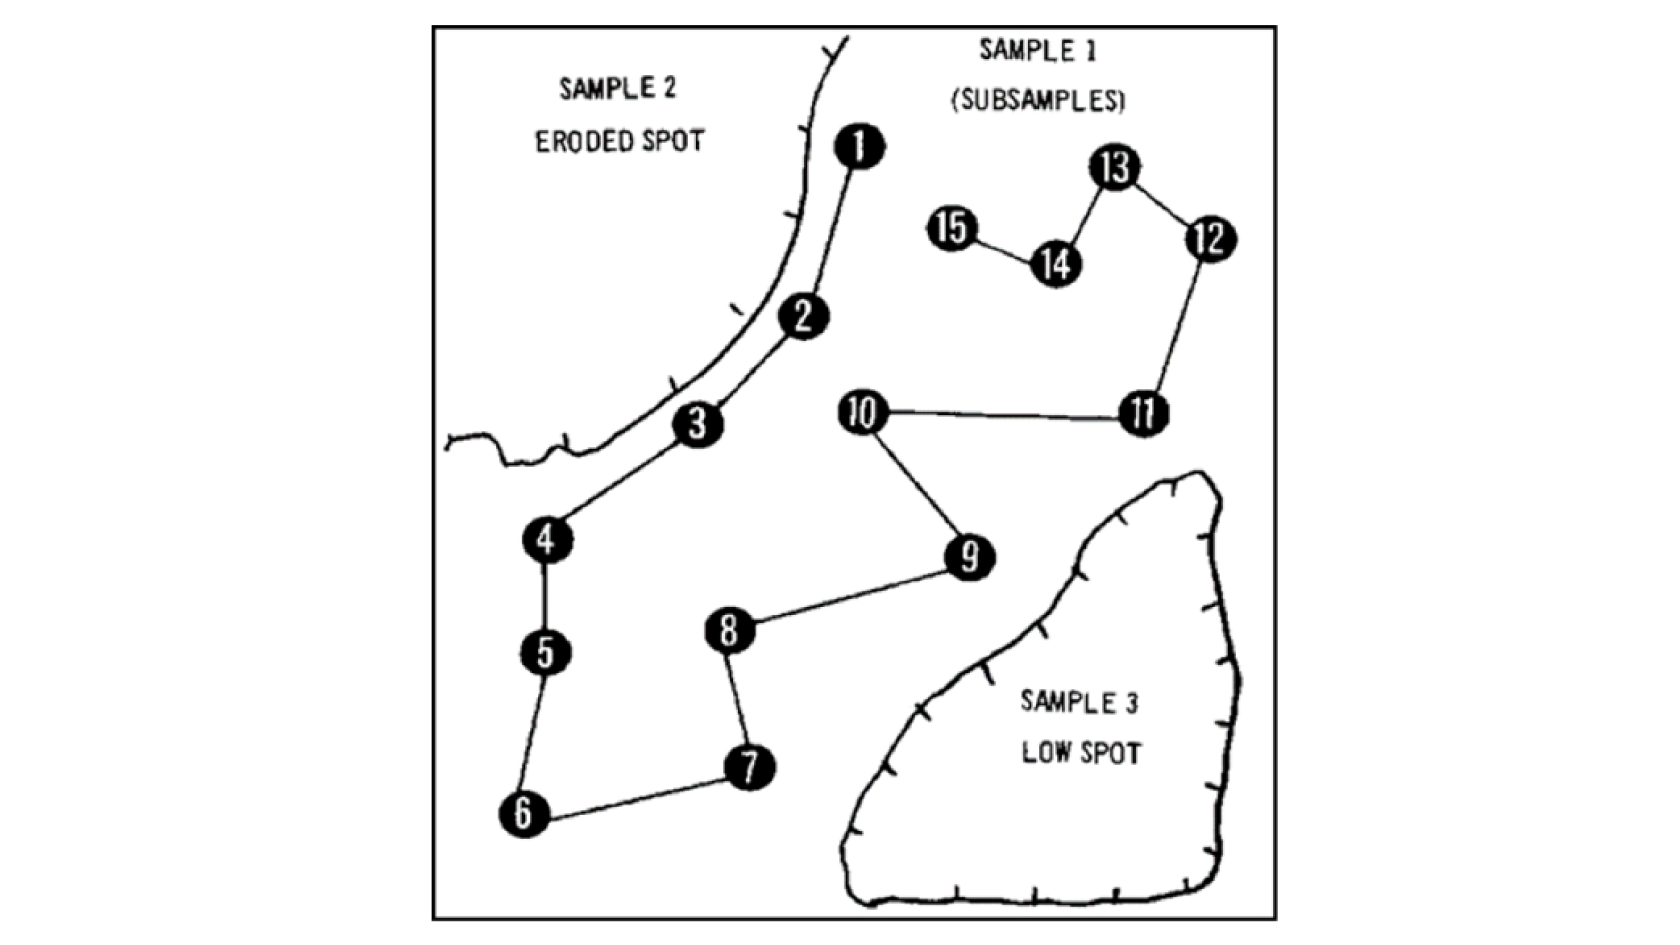
On the other hand, very dry soils are usually difficult to carry out samples. It should not be forgotten that soil moisture does not affect the test results, since the samples are dried before being analyzed. In general, the fields can be sampled at any time after harvest or before planting, avoiding sampling immediately after applications of fertilizers or limestone, because these samples will not represent the actual fertility of the soil. SAMPLING Before collecting the samples, the selected area should be clean, removing leaves, grass, sticks and stones. A map of the area containing the location and numbering of each sample and the corresponding area should also be made. This map can later be used by the farmer to identify the samples, the results issued by the laboratory and the liming and fertilization recommendations provided for each area. Samples should not be collected near corrals, stables, houses, bathrooms, sheds, trails, anthills or termite swells, as these can contaminate the sample.
Several subsamples should be taken from each glebe to obtain an average of the sampled area, by going in zigzag through the selected area and collecting 20 subsamples per homogeneous zone.
The depth of each simple sample varies with the type of crop, soil management and goal of evaluation. From 0 to 10 centimetres should be used for annual crops under a no-tillage system after the 6 consecutive cultivations with in-line fertilization, maintenance of formed pastures and natural field without soil revolving.
0 to 20 centimetres is the ideal depth for perennial crops (fruit trees, coffee, clove, oil, rubber tree, etc.); annual crops, formation of perennial crops and pastures, with the conventional system of tillage, and up to 6 consecutive annual cultivation, under no-tillage system, fertilized in line.
Finally, 0 to 40 and 40 to 60 centimetres should be sampled before the first planting in the area, aiming to detect the occurrence of physical (rockiness, compaction) or chemical barriers that prevent root growth in depth, limiting the absorption of nutrients and water. SENDING IT TO THE LAB
 After collecting the samples, they must be packed with plastic bags to avoid contamination, correctly
identified with its name, farm and field information, glebe and date of withdrawal, marked in the map
created before and sent to the laboratory. Keep in mind that sampling errors cannot be corrected in the lab,
therefore it is necessary to follow the procedures described correctly and avoid contamination during the
collection, drying, packaging and transport of samples.
After collecting the samples, they must be packed with plastic bags to avoid contamination, correctly
identified with its name, farm and field information, glebe and date of withdrawal, marked in the map
created before and sent to the laboratory. Keep in mind that sampling errors cannot be corrected in the lab,
therefore it is necessary to follow the procedures described correctly and avoid contamination during the
collection, drying, packaging and transport of samples.
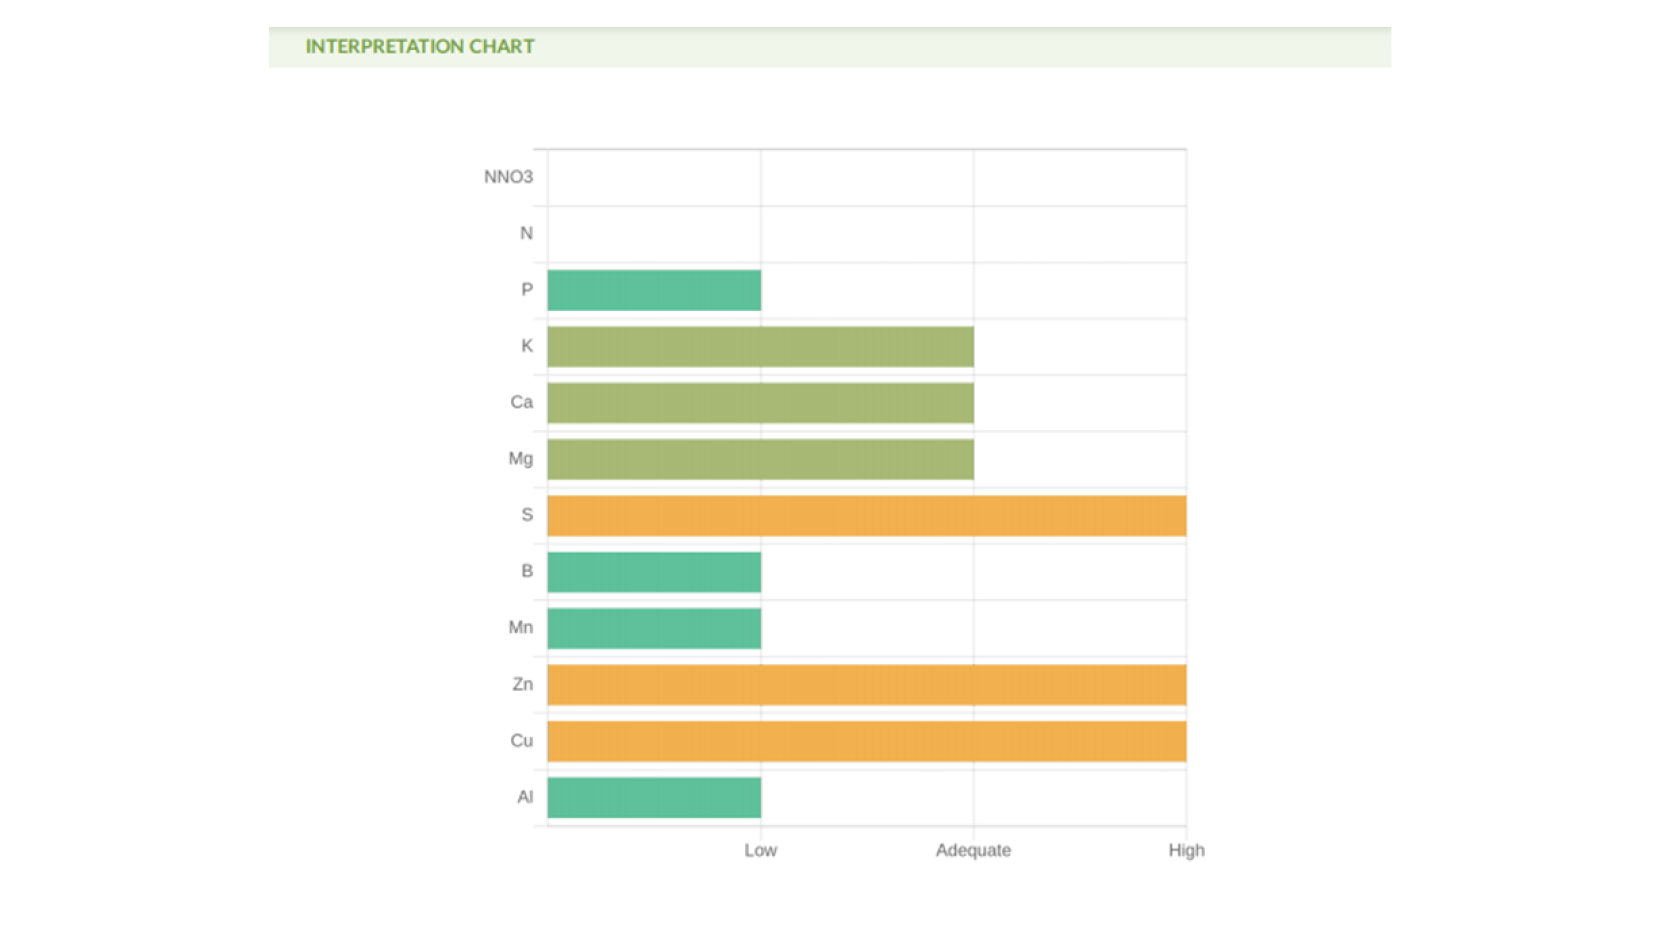
Once the laboratory runs the tests, it will provide a report with the information required, and after that, it is up to us! Just upload the results into i-Plant Nutrition and we will do the interpretation and creation of a fertilization program for each one of the fields, considering the crops and soil’s needs and fertilizers and liming material available for you. Take a software tour to see how easy and effective it is! (Link to Software tour)